As a faculty member, it is important that your students feel welcomed into the learning environment. It can be a little harder to do this online, as students enter the site at different times and with varying skill sets.
In this module we explore ways you can make your students feel welcome - starting with strategies that help form a positive first impression. Having an understanding of who your students are and how they learn will help you do this in a manageable and appropriate manner.
Learning Outcomes
At the end of this module faculty will be able to:
Develop a welcome strategy that follows the OntarioLearn Course Development Checklist.
Prepare a welcome message that is inviting and encourages student success.
Identify the key information that must be readily available to students at the start of a course.
Build a critical path that clearly outlines the required activities, readings and evaluations for the online course.
Demonstrate an understanding of the various learning styles one may encounter in the online environment.
Define the three levels of interaction that occur in a quality online learning environment.
Gain a clear understanding of the Instructor's role in the online learning environment in relation to building relationships and encouraging interaction.
OntarioLearn course registrants represent a diverse variety of learners. You will likely find a mix of full-time college students combined with the part-time learners who may be working parents, studying for career change or for career advancement purposes.
Every few years, the Ontario College system conducts a comprehensive Continuing Education survey that helps us understand more about our learner demographic characteristics. This survey will be conducted during the Winter 2012 semester and we will post the results to this site when they are made available. In the meantime here are some trends, based on the literature and our experience.
Full-time post-secondary students.
A recent Stats Canada research study shows that more students are working while they are in school in order to reduce their debt-load upon graduation; therefore they are looking for flexible learning opportunities to help them stay the course in relation to their studies.
Students with Post-secondary experience/credentials.
The “credential creep” is alive and well in our society and there is a growing need amongst post-secondary educated people to build upon their credentials in a flexible way. More and more colleges are adding Post-Graduate credentials to their dossier of programs to attract these mature learners. The flexibility of part-time online learning is an ideal delivery format for such programs.
International Students.
It's not a secret that colleges have increased their international recruiting practices. A recent College's Ontario Environmental Scan noted that more than 15,000 international students were registered at Ontario Colleges in 2010; a 48% increase from 2009. It is quite logical to assume that some of these students will be present in the online learning environment as well.
The state of the course site on first login impacts “the first impression” students will have about you, the course and possibly learning online. While there are certain factors you cannot control, it is important that you have some level of presence in your site on the first day.
Initial “To Do” list:
While your OntarioLearn Co-ordinators and host Colleges try their best to give advance notice about teaching opportunities, sometimes things “just happen”. To avoid a barrage of unnecessary email at start-up, you should focus on completing the following 3 tasks as soon as you get access to your course site:
1.) Add your course content
Some host Colleges take care of this for their Teachers, but it’s your responsibility to make sure it is done.
If you are responsible for adding your own material and you can’t put everything up right way, be sure to post the current course outline and the first few modules as quickly as possible.
Post a notice to advise the students of the status of the content. This will save you from receiving a bunch of email at start-up, as students will likely think they are doing something wrong or that there is a technical issue with the site.
2.) Update all important dates
Make sure the course start and end date is clearly visible in the site. Usually this is posted somewhere on the homepage.
Update all assignment and quiz deadline dates. Students find it very frustrating to enter a site that has dates listed from the previous semester; some even think they have been added to the wrong site.
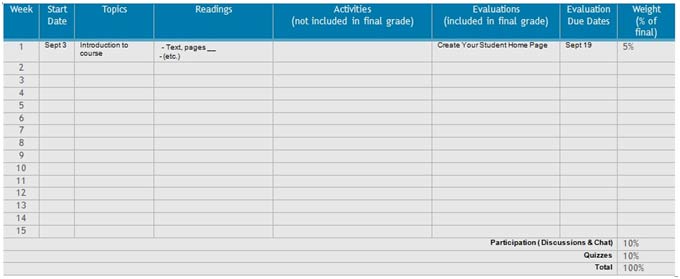
Create and/or update the “critical path” document to your site. See below for more detail about the critical path and to access a template in both Word and html format.
3.) Send a message to your students
Add an announcement or a header to your homepage that welcomes the students, provides a quick introduction and briefly informs them of how to get started.
Establish a discussion post titled "Student Introductions". Start the thread with your own introduction that models how you want the students to introduce themselves to their classmates.
The OntarioLearnChecklist provides examples of such messages.
The Critical Path is one of the required elements identified in OntarioLearn Course Standards Checklist .
This document is the calendar, time line or schedule for the whole course. It is an important document for students as it sets out, week by week, everything they will need to do in the course and when they should to it. Having this document accurately prepared and uploaded to your course site helps students stay on track and manage their time.
Including this document in your site will:
Dispel the myth that online courses are self-paced.
Demonstrate the amount of academic work required to complete the course.
Maintain a record of their learning. The critical path is a key course document and students should be urged to retain a copy of this file, along with the course outline for their learning portfolio.
Activity
Download a template for a Critical Path and begin building the document for your course.
Be sure to add the critical path as a web-page or as a .pdf document.It is important to provide students with the specific information they will need to complete the course. This document is your students’ “to do” list. Providing weekly dates helps them stay on track and saves them from having to figure out what “week” they are in. Knowing the assignment due dates in advance will save you from receiving a multitude of extension or late submission requests caused by students "not being aware of the due date".
The first step is being aware of the various learning styles.
In addition to the demographic and educational differences of those in your online course, it is important to be mindful of the various learning styles that are also present. It can be an arduous task to accommodate each learning style, but a good online teacher/course developer will do his/her best to incorporate content and activities that will help everyone succeed. Being aware of the various learning styles is the first step.
Ke Zhang and Curtis Bonk (2008) prepared an excellent article that explains the various learning styles and links them to effective online learning activities. This article reviews Kolbs Inventory, Honey and Mumford’s Learning Styles and Gardiner’s Multiple Intelligences Model . It provides specific details in relation to characteristic skills examples of preferred online learning activities, and examples of emerging technology that is suitable for the particular style.
VARK is another learning style model that focuses on four specific learning preferences:
V – Visual (See)
A – Auditory (Hear)
R – Reading (Read)
K – Kinesthetic (Do)
With the use of various multi-media tools, the online learning environment can be transformed into an environment that is conducive to each of these styles.
Self Reflection Activity
There are a number of tools available to assess your own learning style. Understanding your learning style will help you gain an appreciation for the various styles you will experience in your classroom.
Franklynn Chernin, from George Brown College, developed a questionnaire to get students thinking a little more about the way they learn. It is simplistic in structure, but provides some very practical information that can help you develop learning activities and understand the VARK learning model.
Share your strategies on how you incorporate one or all of the three levels of interaction into your teaching practice. Add your ideas to the Wiki.
Examples:
Student to Instructor: Tool: Chat/Wimba; Activity: Course Welcome
During the first week invited students to join me for a "webinar" that allowed me to introduce myself and give students an orientation to the site. Using the AppShare feature, I focused on showing the students how to navigate the site, specifically how find the important course information. After the orientation, I hosted a short Q ansession. This got the students off on the right foot. I also archived the event and posted it in the site. This was especially helpful for students who registered late and could not attend the session.
Student to Student: Tool: LMS Wiki; Activity:Building a Menu
At different points in the term they would learn about the different elements of a menu (i.e. appetizers, entrées and desserts). In a group, students use a Wiki to begin creating a menu that would be presented at the end of the term.
I encourages students to set-up accounts on PB wiki or another internet-based WIKI tool (Not Wikipedia). I chose to use an external Wiki because I wanted the students to continue to use this resource throughout the culinary. The purpose of the wiki was to create a Personal Recipe Portfolio; an area to store personal recipes that could be easily edited and new ones could be added.
In an effort to create a learning community with your students, you should model the relationship building process by preparing a personalized welcome message for your students. While the message should be representative of your personality, it should include the following information:
A brief description on how to communicate within the course site.
General expectations about the course and student conduct.
Initial instruction on how to proceed in the course (i.e. a general overview of how you have organized the course materials.)
Other information you can include:
A brief biography, including some facts about your qualifications and expertise in the topic, and a little bit about your motivation, interest and goals in teaching this course. The goal here is to establish credibility regarding your expertise in the subject area and to give them an opportunity to see the "human side " of their teacher.
Complete information about where the student can go for help, organized by the type of help needed.
Request that students go to the discussion board and introduce themselves to their fellow classmates. You should lead this discussion by posting your introduction and model your expectations.
Share your best practice: Welcome Message Comment on our blog and share what types of activities you have used to engage your students during the first week of class?
Getting your students engaged from Day 1
As with all courses, there is a lot of flux and change during the first couple weeks of classes. Typically students have up to one week after the official start date of a course to register, so it is not uncommon to see your class list change dramatically in the first week. It is important to keep this in mind when you are planning your initial course activity.
As Susan Biro, EdD states in her article "Get Your Online Course Off to a Good Start," make sure the initial activities are “low stake activities”. Use the first week to allow students to become familiar with the course site, each other and with you. It is very de-motivating for a student to first enter an online course and feel as though she/he has already fallen behind. When activities are introductory or don’t have a large impact on the final grade, the student will feel less overwhelmed.
In an effort to minimize the isolation factor that is often attributed to the online learning environment, the faculty member must ensure all students are engaged in the course. With an understanding of the various learning styles present in the online classroom, you will be able to identify ways that will motivate and encourage the learner.
The student may choose to participate in an online course for a variety of reasons, but most often it is for the flexibility the environment offers. As a good online teacher, you need to ensure that you are presenting your content in a manner that is not complicated or places additional barriers to success.
The best way to get your students engaged from Day 1 is to have a presence in the course site. Send a welcome message, post announcements that give students reminders about due dates, communicate with them and create meaningful opportunities for them to communicate with each other.
Next steps:
Now that you have the tools to make a good first impression, it is time to explore strategies that will keep the student engaged for the duration of the course. Module 2 will provide insight into learning theory, so that you can develop meaningful course content and activities that demonstrate best practice for learning through the web.
There are three main levels of interaction that should be present in all good online courses.
Instructor to Student
Student to Student
Student to Content
1Instructor to Student
Students expect the Instructor to be actively involved in the learning process. This is what sets the Instructor's role apart from that of a tutor who evaluates student submissions. A good online teacher demonstrates a strong presence in the course site through regular communication and by providing feedback.
An easy way to show your presence in a course site is by posting regular announcements. This can be done using the Announcement tool or by creating a Discussion posting called "Course Information". Use this area to send students reminders about upcoming deadlines, notices about current events that may be of interest status updates on grading, etc.
2Student to Student
Isolation was one of the disadvantages of distance learning; however with the advent of web 2.0 technologies there are now plenty of opportunities to build relationships amongst classmates. As noted before, in an OntarioLearn course, there is the potential to have students from 22 different colleges in your course. This brings unique perspectives and diversity into the classroom. It is important that the Instructor build opportunities for this level of interaction to occur. Module 4 will provide insight into tools and tips to move your course into the Web 2.0 world.
3Student to Content
Students form their first impression of a course site by the quality and organization of the content presented. The content should not be a re-presentation of the textbook or web resources used, but should complement them. The instructor should use the content in the site to share his/her professional experiences and knowledge.
The content should be available in a variety of contexts; not just static text. Dynamic material (for example learning objects creates the opportunity where students can navigate the course material on their own.
Below is a table of some basic tools that can foster the integration of the three levels in your course site.
Complete the drag and drop learning activity below to gain a better understanding of the types of activities one may associate with a particular level of interaction. Choose a tool and drag it to the appropriate setting. If you are correct, it will stay in the box; if not, it will bounce back to the original list.
Created by the eLearning Department at Humber College
Activity:
Share your strategies on how you incorporate one or all of the three levels of interaction into your teaching practice. Add your ideas to the Wiki.
OntarioLearn prides itself on the fact that all courses offered through the consortium are Instructor-led. This means that the Instructor plays an active role in the learning process.
The Instructor's role in the engagement process is to:
Set the expectations for participation by:
providing clear guidelines, and
modeling the appropriate tone and participation level; if you don't participate, they won't!
Create meaningful opportunities that encourage interaction and collaboration by:
recognizing why some people chose to learn online - don't complicate the process.
Give students an opportunity to contribute to the course content and promote the construction of knowledge by:
not providing explicit detail, but clear instruction that points them in a particular direction and lets them do some exploring.
managing expectations
Without the non-verbal cues that are present in the physical classroom, teaching successfully online requires you to draw on your organizational skills and creativity to keep your students engaged and visiting the course site often. If you do not establish a regular presence in your course site, your students won't either; it's the "out of sight - out of mind" scenario.
Be sure to use the student's name in your message to reinforce a personal connection.
So how do you do this in an efficient manner?
Set realistic expectations up front about when and how often you will reply to messages. Online learning is a 24/7 environment and students will expect you to be sitting at the other end of the computer waiting for their questions; you will need to inform them otherwise. Your college has established an expected response time and it is important to communicate this to your students and adhere to it yourself. Recognizing that responding sooner than later is the best practice, you should let your students know if there are specific days of the week when you will be less active in the site.
Encourage students to use the discussion board in your site for general course related questions. Create a "Need Help/Give Help" discussion topic for course related questions; this way everyone can benefit from your answer and it will help you avoid having to respond to the same question multiple times. As students gain more experience and confidence in the online learning environment, you will notice them helping each other in this public forum. Not only will this save you time, but it will create a learning community!
Limit email correspondence to personal/confidential communication. Be sure to use the student's name in your message to reinforce a personal connection.
Use the tracking tool in your LMS to identify the students who are not active in your course. Be proactive - send a student an email if you notice a student missed an assignment deadline. You can still deduct marks for lateness, but taking this approach early in the course will give the student the impression that you are interested in their learning success.
Build a repository of "common messages". Use a word document to compile a list of commonly used messages that you can copy and paste, then personalize. This document may include items
like:
weekly content updates
standard welcome email messages
general feedback statements for assessments
inactivity message
etc...
Time Management Tip:
Answer email at the same time each day if you can. It is easier than letting the messages build up throughout the week. Your students will appreciate the prompt reply and will learn your response patterns and become more patient when waiting for a reply.
Contain your course communication to the course site. While you may not want to manage a variety of email tools; experience has shown that keeping all student correspondence in one site is much easier than trying to keep track of email messages in an external system that has multiple purposes (i.e. work, home, personal business, etc.). Also remember, unless you change your external email, your students will always have access to you even after a course has ended.
Set up a folder system in your inbox to facilitate finding and keeping student e-mails. Some ideas for folders are: Student Concerns; Assignment Questions; FAQ collection; "Deals" made with students.
Use the BCC field when sending the same message to multiple students versus emailing each student individually. NOTE: Some LMS Mail tools, like Blackboard, delivers messages prepared for multiple receivers to look as though the specific recipient is the only one to get the message.
Backup Precautions:
Keep a list of alternate e-mail addresses of your students to use as a backup in case the LMS is not available.
Give your students an alternate e-mail address to contact you in case they can't access the course site. This should be your institutional email. You can also direct your students to leave a message with your OL Coordinator - be sure to provide this contact information as well.
Download your Grade Book on a weekly or bi-weekly basis, especially during the times when you are doing a lot of grading. Save the file on a location other than your computer such as a thumb-drive or your college's network driver and replace it after updates are made to avoid having a series of files with duplicated information.